How to Setup Agent as a Hosting Provider
This module provides examples of how to utilize Lincoin’s tools as a hosting facility.
We will create a mock Bitcoin mining facility highlighting the roles and tools that can be leveraged with Lincoin Mining Platform. “Sub Accounts”, “Team Members”, and other tools defined in previous modules will be expanded upon with examples and potential scenarios. There is an unlimited combination of use cases and setup options. All scenarios cannot be covered. This module provides the basic foundation to create a custom setup for a hosting provider. If you need further assistance, feel free to reach out to the Lincoin Team or the Telegram group.
As a Hosting Provider Lincoin Mining Platform offers a variety of tools for Hosting Providers, to include but not limited to the following.
- Team Roles – Owner, Manager, Technician, Host/Client, and Accountant
- Agent Service
- Asic Management
- RAILS – Mine Automation Tool
- Host/Client Tunneling to Mining Servers
- PDU Access & Control
- Antspace Control
- Asset Management Tool
- Programmable Logic Controllers (PLCs) Coils
- Profit & Loss Reports
- Trouble Ticket System
- Energy Trading Platform
- Scheduled Payments
As a Hosting Provider it is important to review “Sub Accounts” and their roles carefully as certain roles may not warrant access to revenue history, P&L reports, and write access features. A review of “Team Roles” are illustrated below.
Team Roles assigned by the Owner (Creator) include the following:
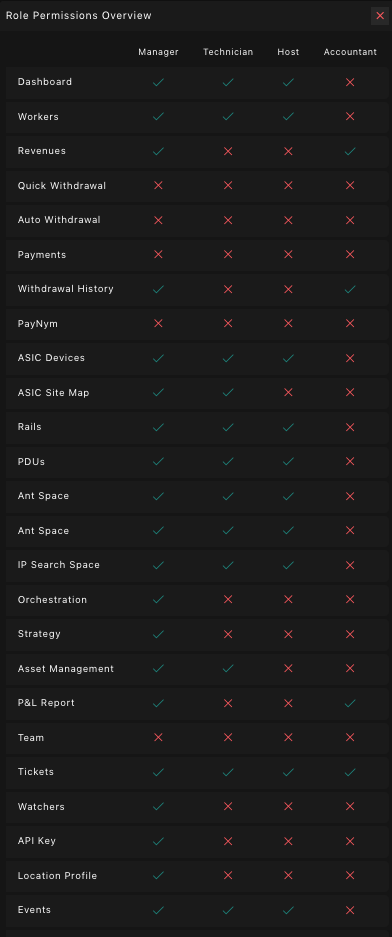
Owner – The creator of the account. Has full read/write access the platform
Manager – Has full read access, limited write access. Cannot edit withdrawal addresses, set payments, or add Team Members. However, can change Client worker settings, and Pool data if enabled.
Technician – Can only see technical data and has limited write access
Host/Client – Can assign devices to a user and has limited access to host/client accounts similar to technicians. For example, a host/client role may be responsible for several sub accounts and have access to their devices at a hosting facility. This will include: Dashboard, access to workers, Rails, PDUs, Ant Space, tunnel into the worker web GUI, set rails, create ticket events, and agent request logs.
Accountant – Has read access for financial data. No Write access.
Roll Permissions are as follows.
Step by step instructions for adding and accepting “Roles” are discussed in further detail in the Sub Accounts & Teams Module.
An “Owner” account is necessary to facilitate the appropriate management tools. Ensure an Owner account is established and “Team” members are defined. At minimum, there should be an Owner and Host/Client connected to the Hosting facility account. Other Roles such as Manager, Technician, and Accountant are supplementary and not essential.
Additionally, Agent Service must be connected via a single board computer such as a Raspberry Pi, Rock Pro 64, or other PC hardware. It must utilize Windows 64, Linux x64, or Arm 64 operating systems connected to the mining facility’s local network consistently (24/7). Instructions on installing the Agent Service are available here.
Example Setup
For this scenario we assume it is a single site facility with a manager, technician, accountant, and host/client. This scenario assumes you have Agent Service installed locally and an Owner account is established. The hosting provider needs to import the workers that are connected to the network. There are two ways to import workers onto the platform.
- Scan the network for connected workers – Recommended
- Manually Upload from Excel or CSV – Not Recommended
Scan Agent Tool
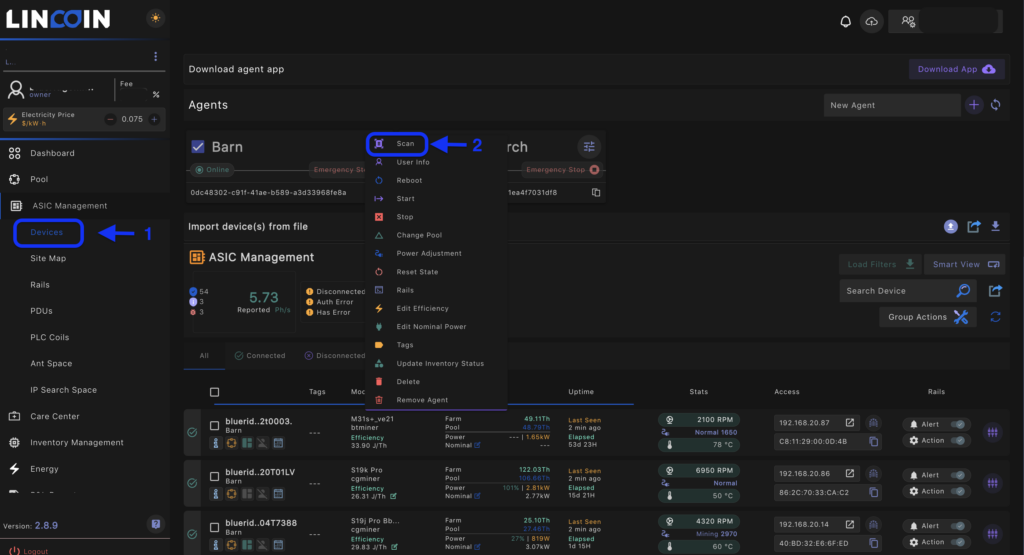
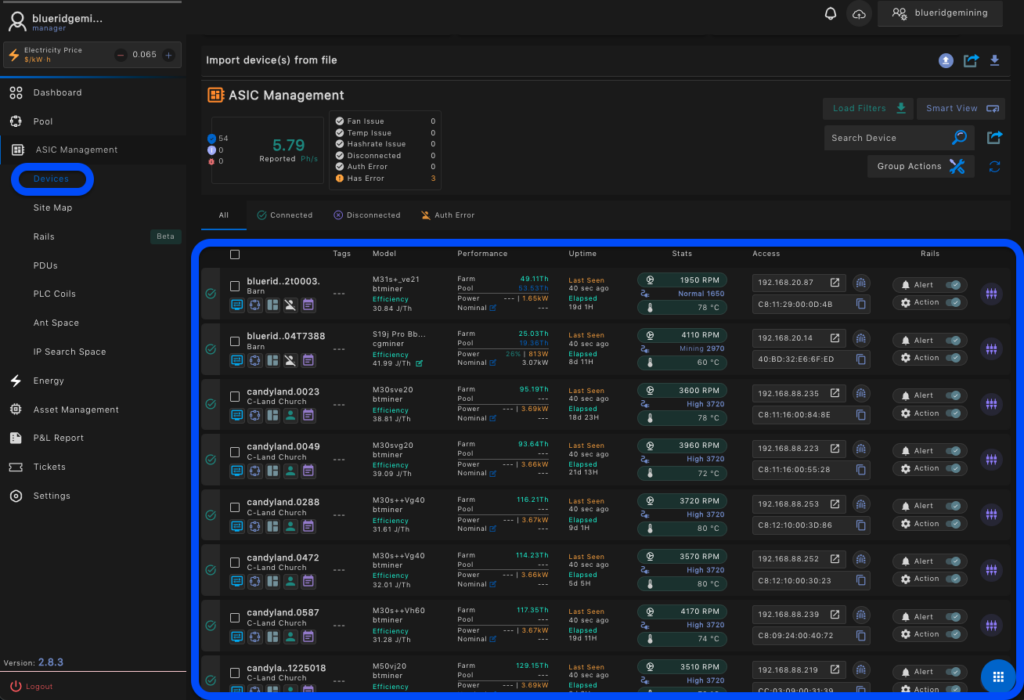
The simplest way to import the workers that are already connected to the local network is to utilize the “Scan” tool in the “Devices” tab.
- Select “Scan” in the appropriate Agent
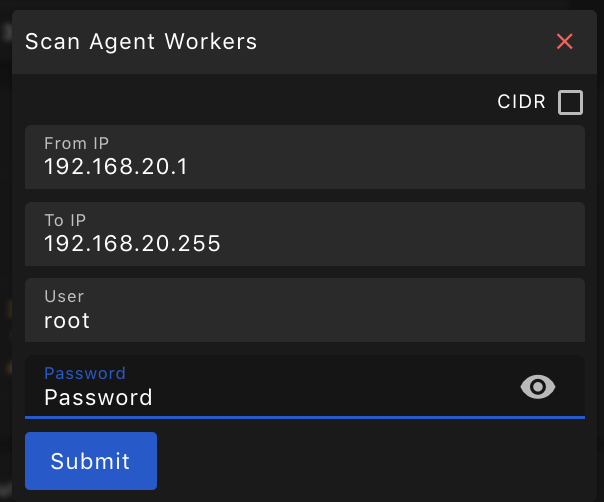
- Enter the appropriate IP range to scan
- Enter “User” and “Password”
- Select “Submit”
When the import is complete you should have a Devices screen similar to this:
Import CSV or Excel Agent Tool
It is recommended you scan workers using the Agent Tool. However, this method is available. Importing comes in handy when creating the site map or importing PDU ports. It is a similar process. Nonetheless, if a user wants to import via CSV or Excel the “Devices” Tab allows the owner to import worker details. The process is as follows.
- On “Devices” tab select “Download Template”

- The template should look similar to this:


At minimum the following must be filled in:
- Worker name
- Agent name
- Subaccount
- IP
- Mac address
- User name
- Password
- When the template is filled out. Upload the CSV or excel file
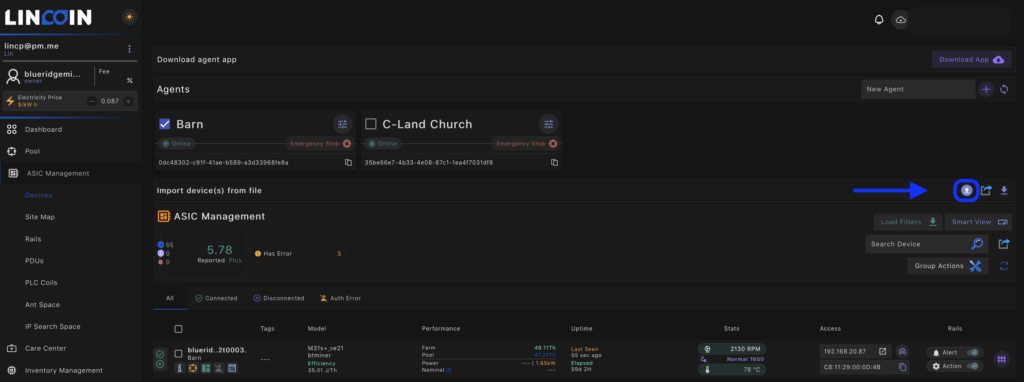
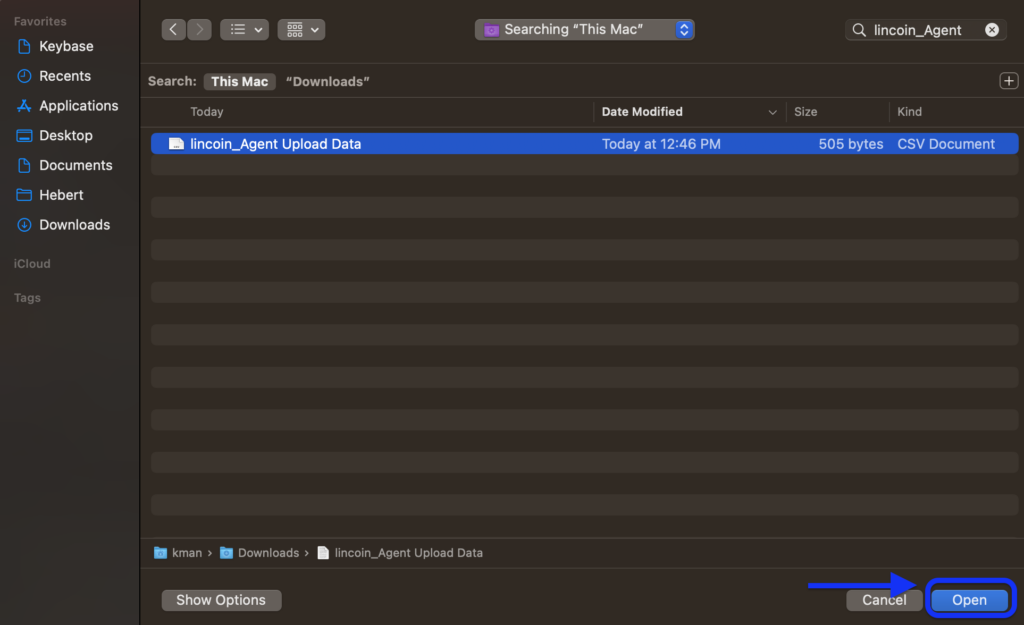
Once Agent is installed and the Workers are visible on the “Asic Management Tab ” the owner can begin new client onboarding, creating host access and assigning team roles.
New Client Onboarding – Host Access/Team Rolls
If a new client is racked in the facility and wants access to the management platform it is necessary for the hosting facility to add the client as a “Sub Account”. It is not necessary that the client point hash to the Lincoin Mining Pool. However, they must have an “Owner” account if they want to monitor and access their servers at the hosting facility. The client’s “Owner Account” has to initiate the connection between their Lincoin “Owner” account and the hosting facility “Owner” Account. The hosting facility must accept the invitation.
After the hosting facility’s client has created an “Owner” account, they must add the hosting facility in the “Teams” tab as follows:
- Hosting Client: Select “Teams” in the left hand menu column
- Hosting Client: Select “New Member”
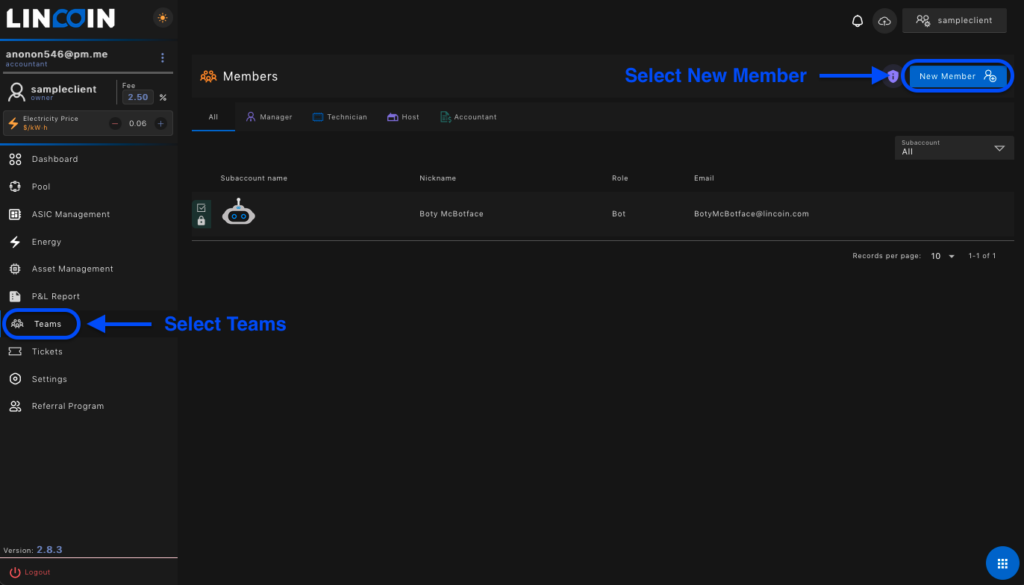
- Hosting Client: Add the owner email of the hosting facility. This will be provided by the hosting facility’s management team.
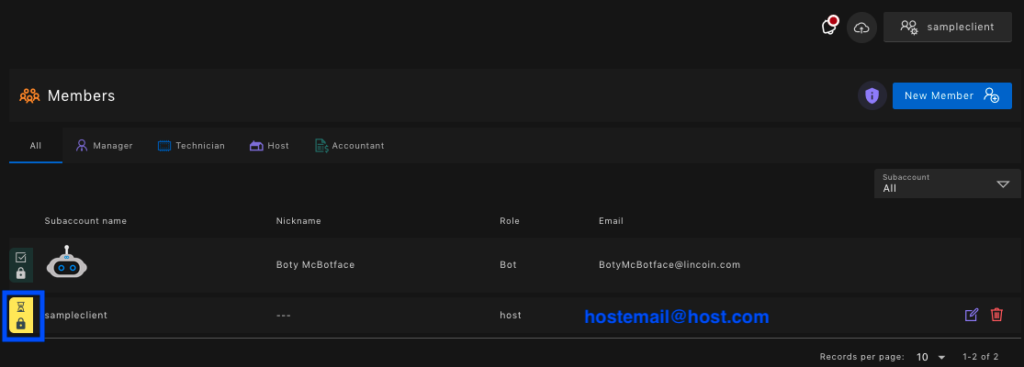
- Hosting Client will see an indication on the “Team Members” page with an hourglass and lock until the Host accepts the invitation.
- Hosting Facility: Approve the request to add the hosting client to the “Sub Account” list on the top right portion of the dashboard.

- Select “Approve”

- Once the “Host” accepts the client invite the hosting facility is able to assign access to the client’s respective servers.
Assigning Access to Clients
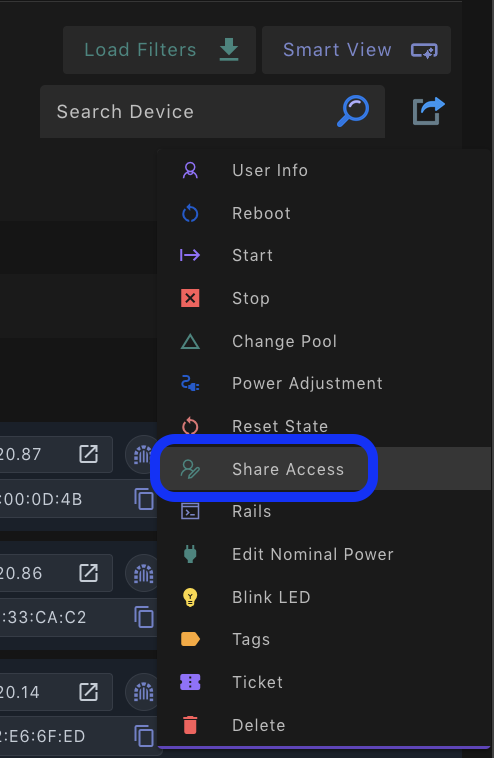
Once the “Host” can view the “Client” in their “Sub Account” shared access can be enabled in the “Devices” tab under “Asic Management”.
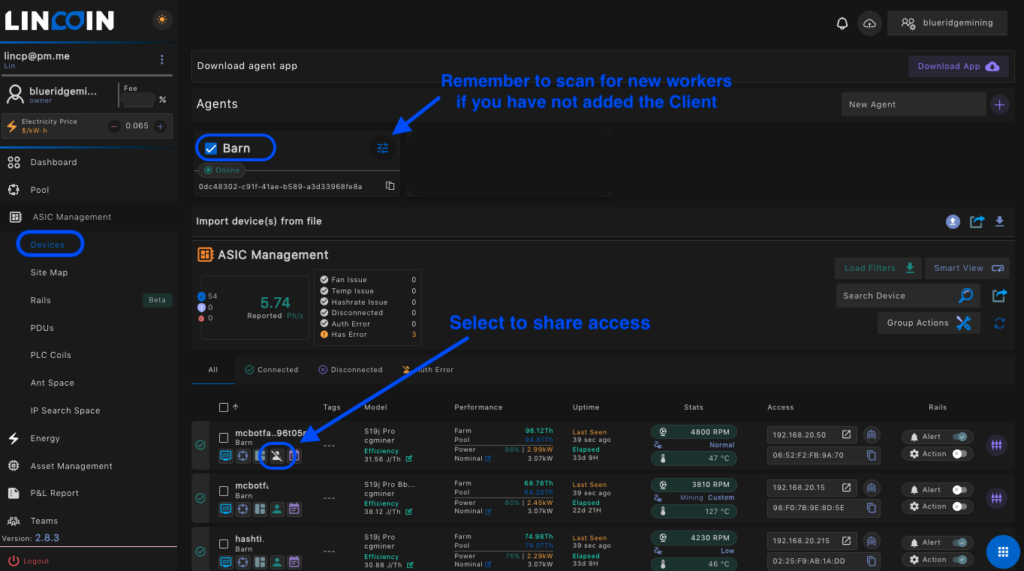
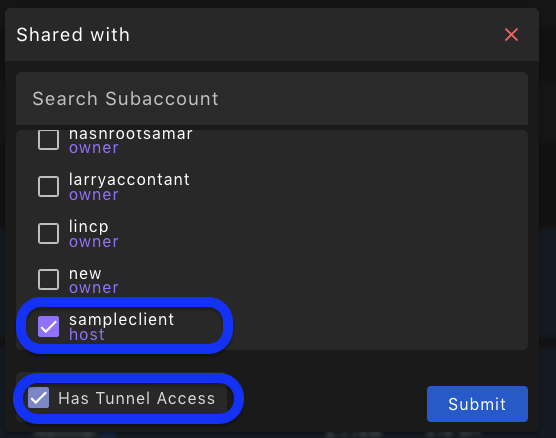
- Select the appropriate sub account to share access. *Note- only one Sub Account can be shared per worker.
- Select “Has Tunnel Access” box if desired to allow the client access to the server web GUI.
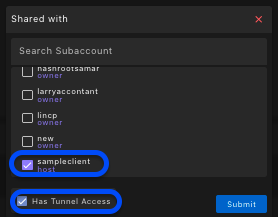
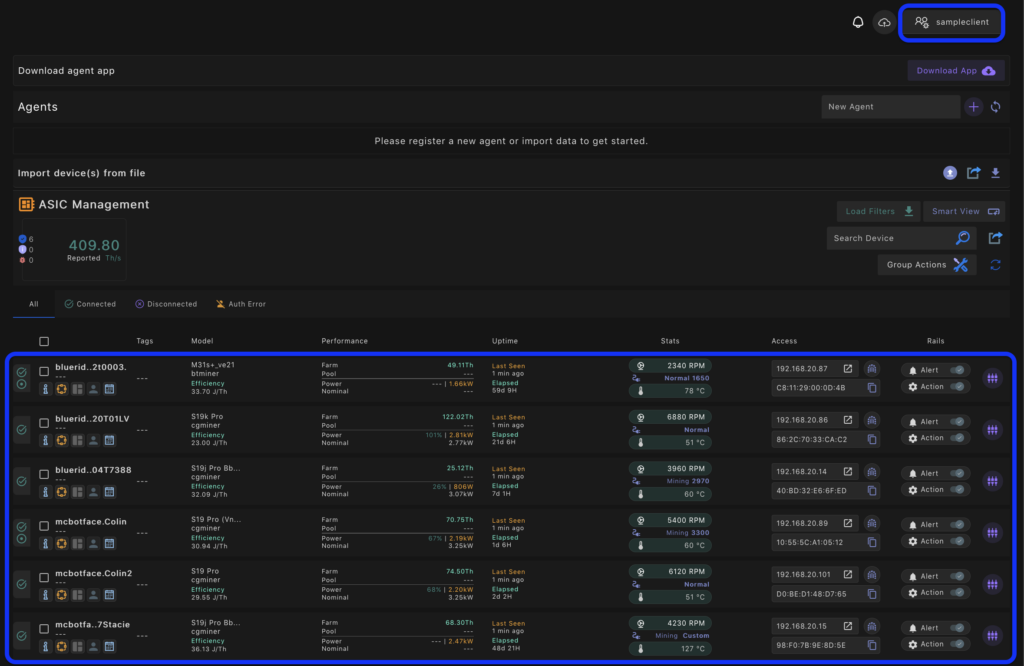
- Once access is shared, read access by the Client is available on the Lincoin Platform web browser “Asic Management/Devices” tab or “Farm Tab” on the mobile application. Additionally, tunnel access to the server web GUI can be made available by the Hosting Facility. Note: Tunnel Access allows a Client to make changes to the server firmware features which can impact the servers power consumption, cooling, and other settings that may not be advantageous to the overall farm operation. It is not recommended to permit this access to user’s with limited knowledge and experience with Bitcoin Mining Servers.
If there are several servers to assign this can be completed in bulk utilizing the “Group Action” button. Group actions are illustrated in the following three images.
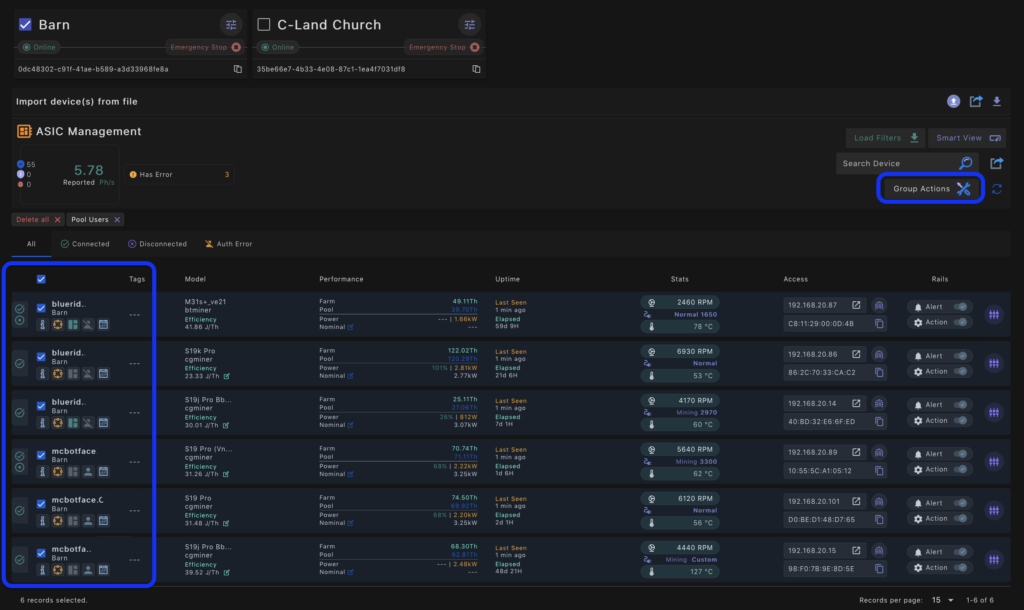
After the bulk shared assignment the sub account owner should have read access. Their Asic Management tab should look similar to this.
PDU Management
If your smart PDU is connected via Agent you can select the appropriate PDU here. This will map PDU ports to the worker to send on/off commands for a specific plug. Users can assign PDU ports through the PDU function. If a worker is assigned to a smart PDU port data will come into the P&L report. This is beneficial for client consumption billing. The PDU tool will take a snapshot every 10 minutes. To utilize the PDU tool:
- Select “Scan PDUs” and enter the appropriate IP range on the network.
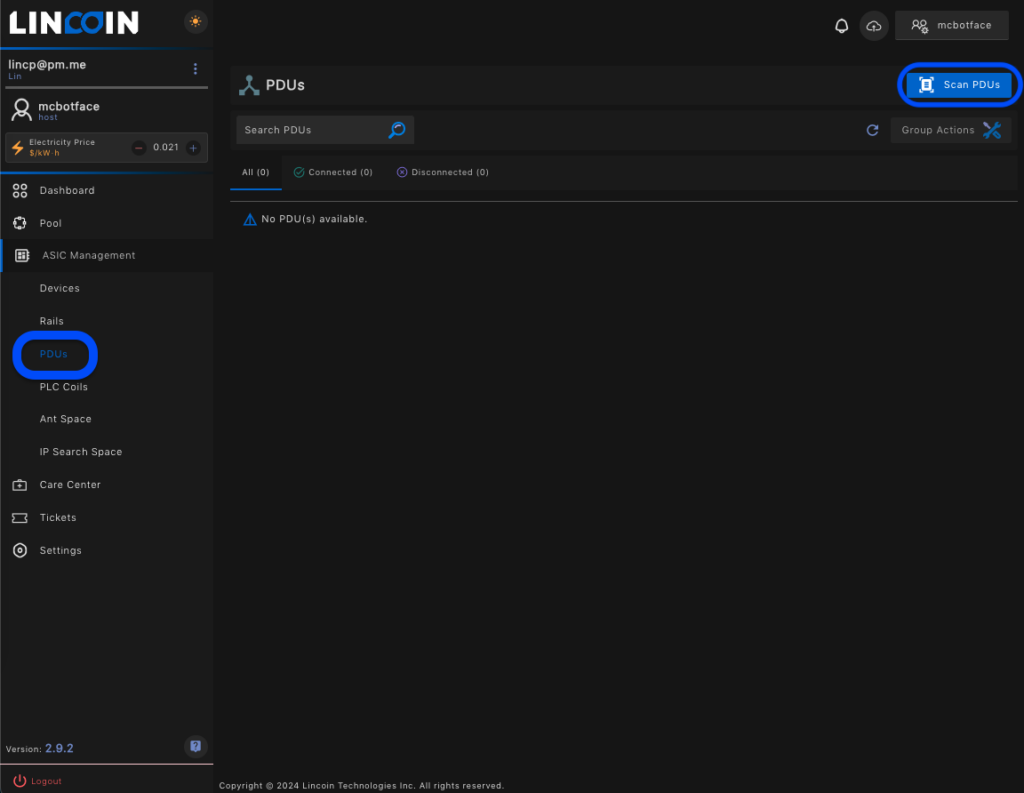
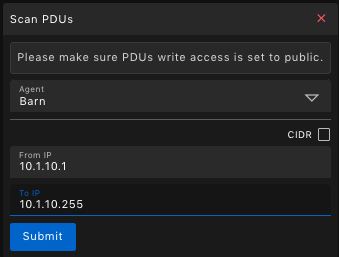
- The scan tool will present a menu screen as follows. Depending on the PDU, environmental temperature and humidity will be displayed.
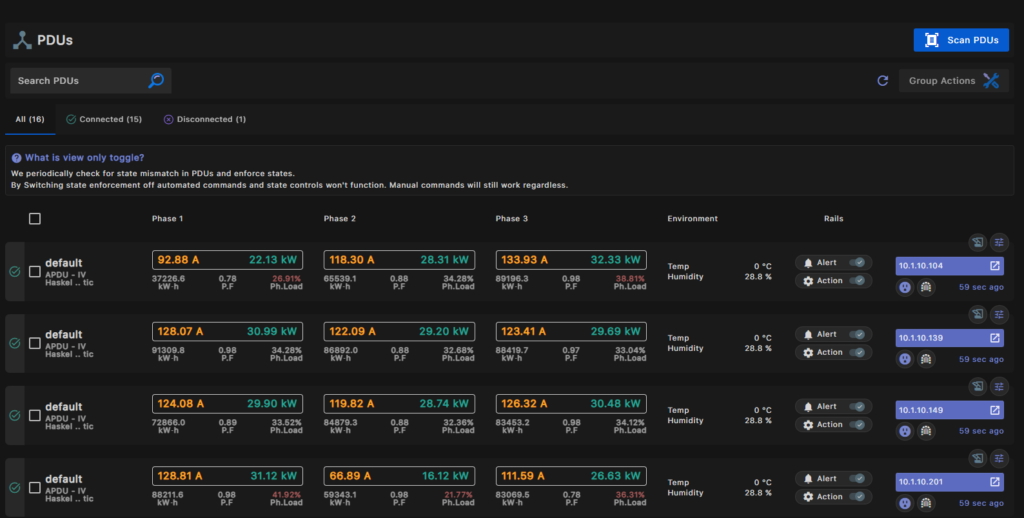
- Selecting the desired PDU will exhibit receptacle/plug available data.
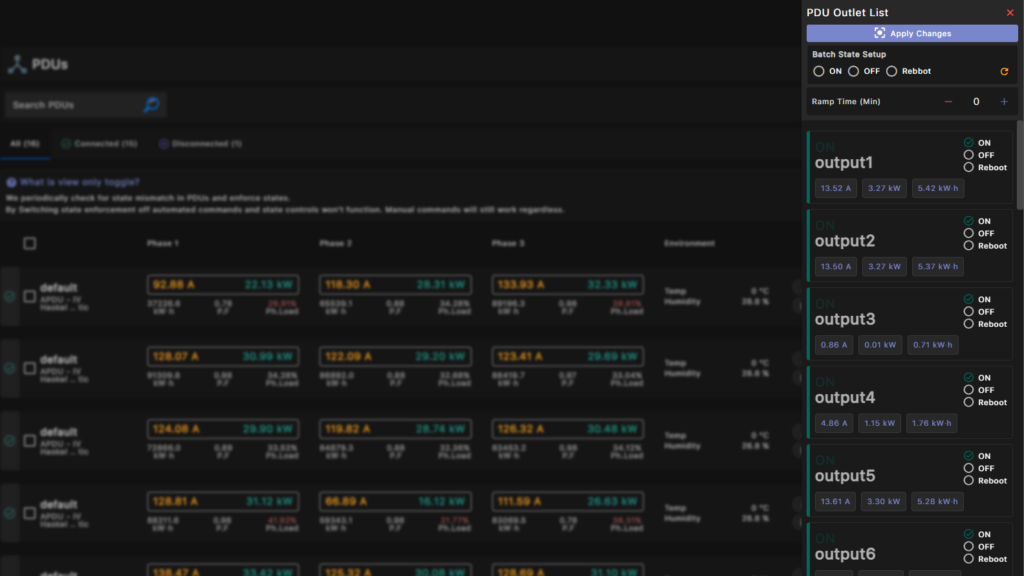
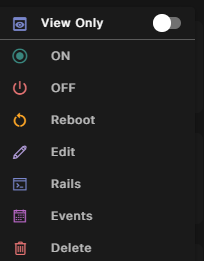
- The PDU tool allows for “On”, “Off”, “Reboot”, “Rails” programing, and “Event” logging.
Trouble Ticket
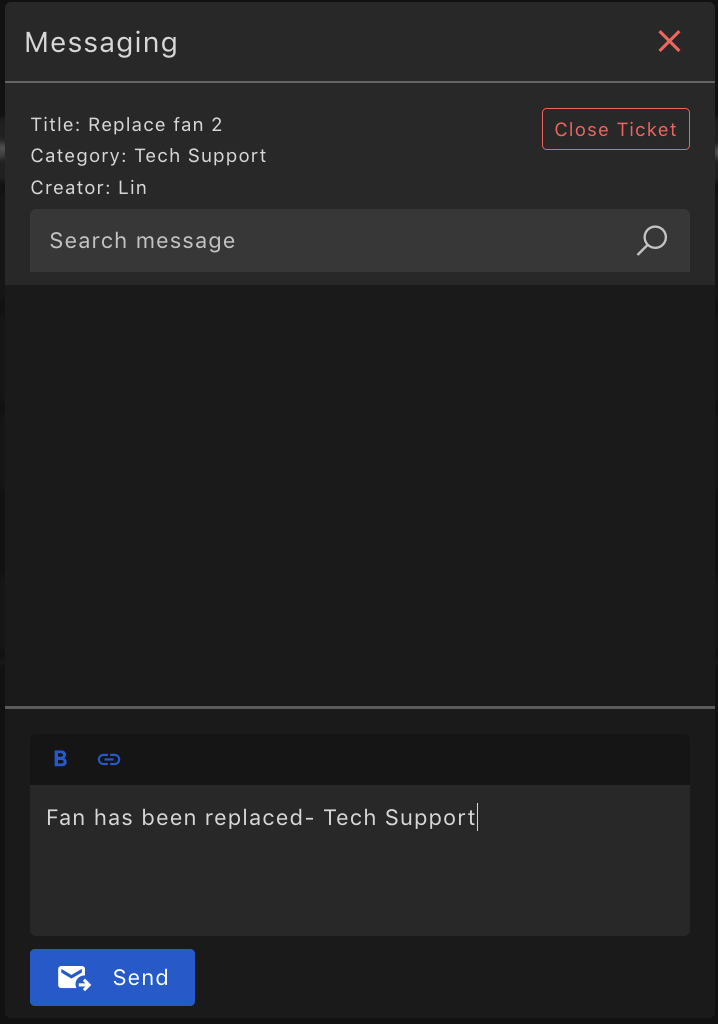
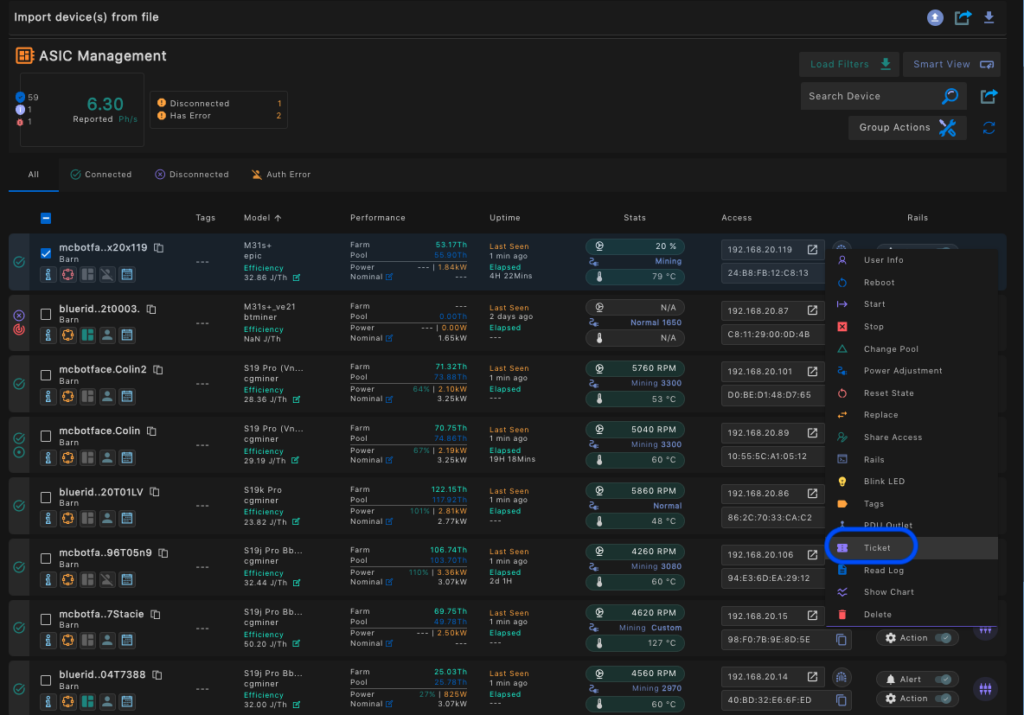
Trouble tickets can be utilized for maintenance or management depending on the task desired. Categories include “Financial”, “Tech Support”, and “General”. “SubAccount” team members and “Urgency”can be assigned for whatever means necessary. An example tech support ticket is illustrated below.
- Select the appropriate worker needing the ticket from the “Asic Management” tab.
- Select “Ticket”
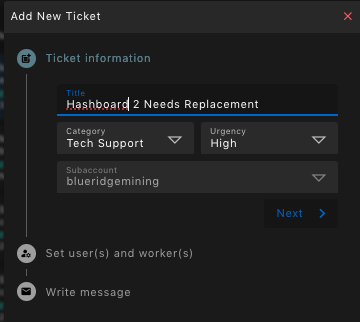
- Enter “Ticket” title
- Select appropriate party to tag in the ticket
- Select “Category”
- Select ”Urgency”
- Select appropriate “Sub Account”
- Select “Next”
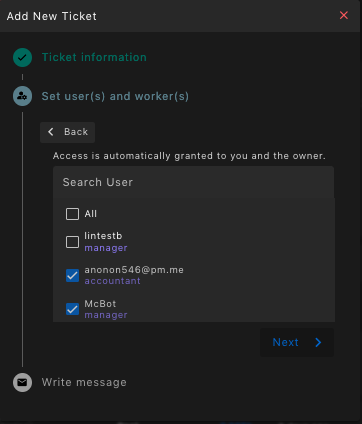
- Select the appropriate user to receive the ticket.
- Select “Next”
- Enter desired instructions or leave blank
- Select “Create”
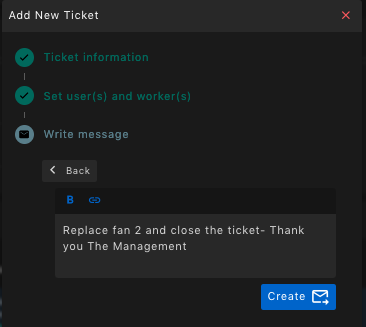
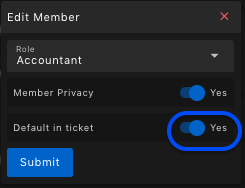
- Note, if the team member role in “Teams” has “Default in ticket” selected they will automatically be copied in the ticket. In order to remove them this must be edited in “Teams”. In the image above it is not likely the accountant needs to know to change the server fan. It may be best to remove the “Default in ticket” selection.
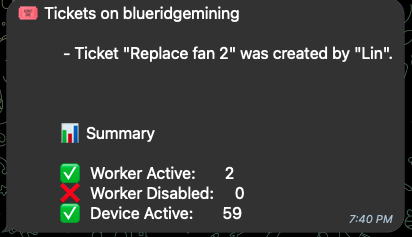
- After the ticket is created the owner will receive a confirmation alert in the “Events List” that the ticket has been created.

- Boty will also give you an alert via Telegram, if enabled.
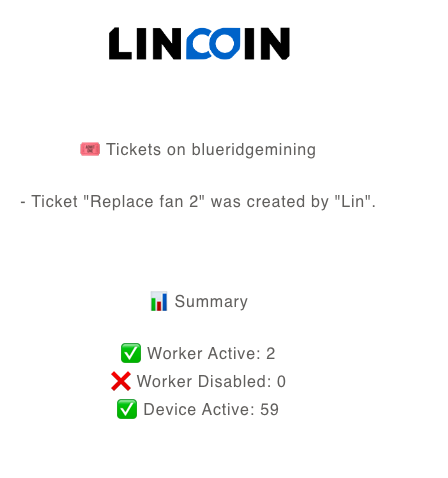
- The selected intended user will receive an email with the ticket.
- Additionally, in the “Ticket” tile the recipient of the ticket will see the new item as follows.
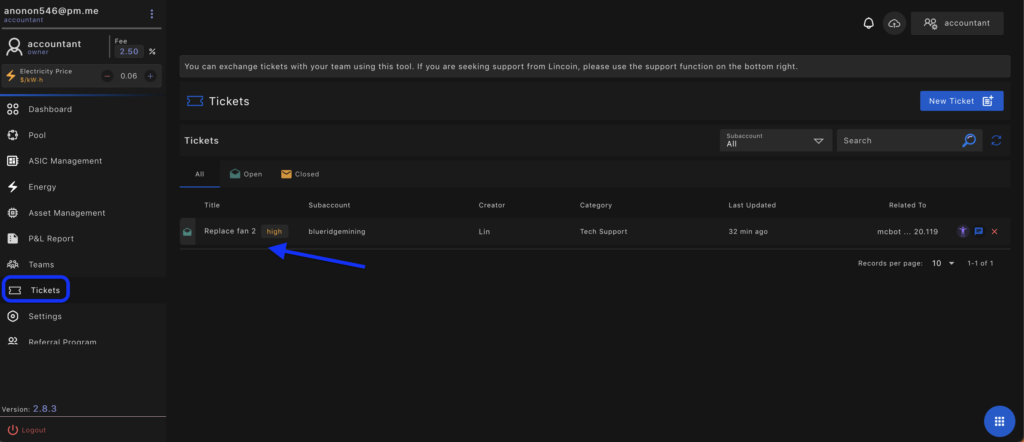
- The recipient of the ticket has the option to message or close out the ticket.
